

Racecar Engineering invited Craig Porley, an experienced Race Engineer to this year’s Formula Student UK competition. Porley has spent the last 12 years race engineering in BTCC alongside full time engineering jobs at Red Bull Racing and Xtrac. Having never been before, here are his thoughts on the competition and the bits that surprised him most.
I found myself in a fairly unique position at Silverstone for this year’s Formula Student (FS) competition, in that I had never been before. Not particularly unique you may say. However, a 40 year old with 20 years working in the motorsport industry, having never attended Formula Student is perhaps more unique. I have been lucky to work with some world class designers and engineers in my career, and I can’t name many of a similar age that weren’t heavily involved in FS at university. So, I was excited to finally witness the competition in all its glory, and intrigued to see if my perceptions of the competition were correct.
Back in the day
This year’s Formula Student UK event saw the 25th anniversary of the competition, so I can’t use the excuse it wasn’t running whilst I was at university. In these early days, it was not uncommon for universities to limit participation to final year students. The sprawling teams of 100+ people with full management hierarchies and vast budgets didn’t exist. I spent the first years of my engineering degree waiting, pining even, to me be involved. We would look enviously at the final year students in the Autolab with that head up shoulders back confident swagger, that came with being ‘in the team’. It felt like the first step on the professional motorsport ladder. Then came my placement year.
I was fortunate to gain a position working in a team running GT and LMP cars, and spent the year traveling the world. It was a dream come true. The opportunities and virtues of completing a placement year are many, for myself one thing it did was to bring in some much-needed focus. My final year took on new meaning, head down, keep things sensible and get back to motorsport as soon as possible. With the opportunity to continue working for the team during my final year and a project set by them, Formula Student was no longer a sensible option alongside this commitment, despite a longing to be involved. How the tides had turned from the first year.

Fast forward to 2023, a warm summer Wednesday afternoon and I’m sat in my car in the paddock carpark at Silverstone with the windows down, listening to the excited babbling of students signing on and setting up. The level of the excitement was palpable, almost annoying to a jaded old race engineer. It was however, also refreshing, and perhaps a little intoxicating. A nostalgic throwback to those exciting times when so much is new and exciting, with everything yet to happen in a career just starting out. It was a welcome reminder to embrace the present, and not take my past for granted.
The value of Formula Student
Not having competed in FS hasn’t meant a lack of exposure to it from afar. Ten years of race engineering where my data engineer has typically been a student has yielded many FS conversations while driving to racetracks. I can’t name any of these students who haven’t gone on to work as race winning race engineers, designers in F1, or started successful engineering businesses. How much of this was down to their participation in Formula Student? The reason most had been given the opportunity to data engineer in professional motorsport whilst still studying, was down to their participation in FS in the first place. Not only because of the technical knowhow gained, but also the teamwork skills required through FS participation. It also marks out the armchair dreamers from those who are prepared to work hard in a profession known for long hours.
Thoughts on the competition
So did I enjoy my first FS competition? Absolutely. How many of my perceptions were correct? Very few! Perhaps the only notion I had that proved true is the extraordinary levels of design and engineering on show. This was true on a mechanical level in terms of chassis and suspension design as well as the design and installation of the electronics in the EV and hybrid cars. Having spent 6 years in F1, there were certainly some F1 designers of the very near future at the competition.
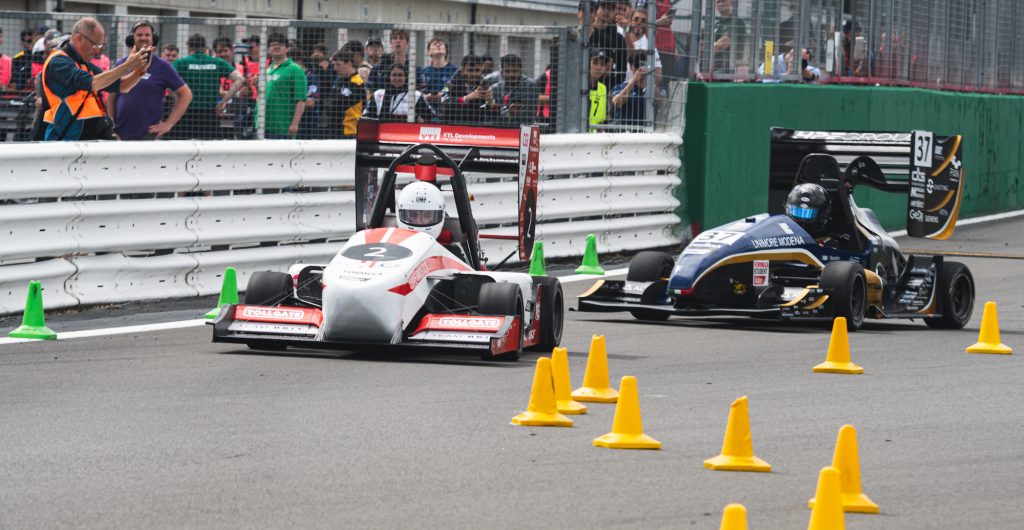
I also found myself sucked into the drama of the endurance event. I wasn’t expecting to particularly enjoy seeing cars go round a tight and twisty course, marked out by cones, not exceeding speeds of 60mph. Yet I was drawn into the battle of Oxford Brookes Racing vs MoRe Modena Racing, for the ‘winner takes it all’ showdown in the enduro. I also found myself joining in with the cheering and clapping for Strathclyde University every time they got going again following technical issues. Despite my reservations of the course itself, I also enjoyed watching the cars. Every entry had its own handling characteristics, good or bad, and the top entries displayed some incredible slow speed turn-in handling in the tight hairpins. It was a more enjoyable two hours spent watching the enduro, than many an F1 race of late.
Formula Student surprises
So what perceptions of mine were broken? One was over the EV category. I was expecting a lot of ‘off-the-shelf’ components bolted into cars, cobbled together to get them running. I think my own ignorance to the EV class had probably wrongly shaped this opinion. What was on display was a range of custom designed and built batteries, motor control units, and some incredible motor installations in a wide range of architectures.
The ‘mechanical’ engineering aspect of the competition is also not lost through going EV. I had wrongly thought an EV car would be surrounded by electrical engineers and programmers. Of course, nothing wrong with this, but as a mechanical engineer, I think there was an ill-informed sense of being pushed out of a competition with roots set in mechanical engineering. This couldn’t have been further from the truth.
Whilst there were of course an increased number of electrical engineers and programmers, from a mechanical sense designing and engineering the installation of an E-motor is no different to an engine. If anything, perhaps more of a mechanical challenge since multiple motors are the key to success, each needing a custom designed gearbox. What was striking when talking with the EV entries, was a strong integration between mechanical and electrical departments. There was clearly a lot of respect flowing both ways, largely due the fact they each clearly appreciated the wider range of engineering abilities required to make an EV entry not just work, but be competitive. Strong interdepartmental communication to achieve a common goal – isn’t that the same target as working in industry – motorsport or otherwise?
Team spirit
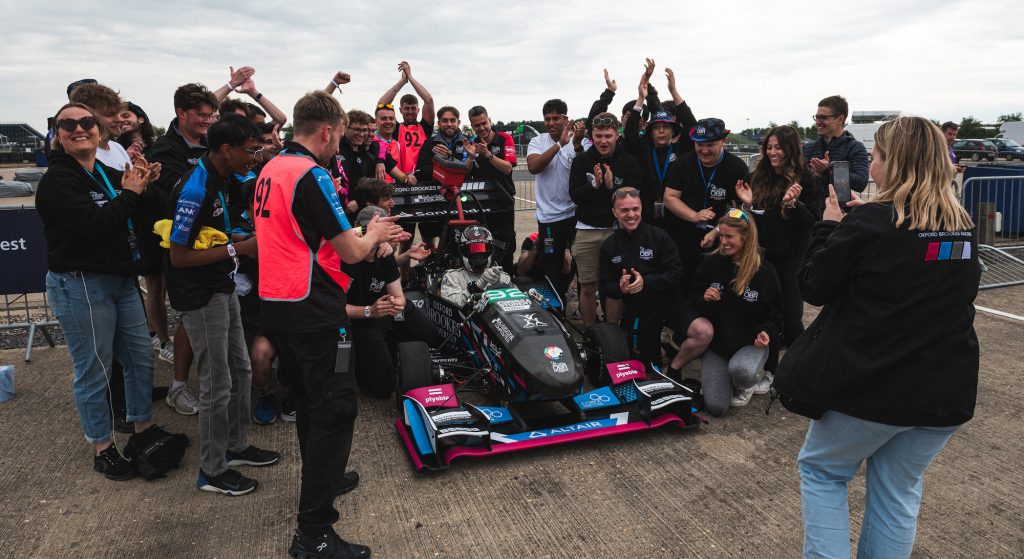
The biggest, and I guess longest standing perception I had was a sense of arrogance from FS team members. I was struck however, by the camaraderie and support amongst the universities. With the competitive nature of professional motorsport, I was expecting a similar closed-door policy between teams. What I witnessed was people proud and eager to discuss the fine details of their car, with anyone that showed interest. Jaded old race engineers, proud parents, or fellow students from other teams. The support for each other was best summed up when I saw a meeting amongst a handful of universities, with someone giving a crash course in how he had made the Brake System Plausibility Device (BSPD) safety system work, and helping fault diagnose others issues based on his own experience. I got the sense that everyone appreciated how hard it is to get a car to the competition and through scrutineering and they wanted others to achieve the same.
I was also struck by the sense of support within the teams themselves. It was clear there was a sense of pride, individually but also what they had achieved collectively. I heard more comments of admiration for others in the team, than wanting to sing their own praises. This was best summed up with Warwick University, who when asked about the biggest change from last year, launched into how they had changed the culture, social, and support network within the team. I had meant the car itself, but the car wouldn’t exist without the team of people and a strong and supportive work ethic.
If the competition itself is the reason for a hard work ethic and strong team spirit, or simply the vehicle to indulge and encourage what is already there in the students is hard to quantify, and perhaps not important. What is important, is the competition offers promising young engineers of the future a chance to push themselves, academically, mentally, and socially. It is unlikely that these young adults have been pushed so hard, for so long, in a team environment ahead of working in Formula Student. Neither is it likely to have worked closely with other disciplines of engineering. Of course, there are those that drop out along the way for various reasons, it doesn’t mean these aren’t promising engineers with bright futures. It used to frustrate me when I would hear some of my younger colleagues tell me it wasn’t uncommon to not make the first round of selection for graduate jobs if FS wasn’t on the CV. I guess it was due to the fact I didn’t have it on mine, and I felt like my career has turned out largely as I wanted. But, and it’s a big but, I get it now.
I understand the sense of pride, sometimes verging on arrogance of some people I’ve worked alongside when they talk about their FS team, sometimes from 10 to 15 years in the past. I now appreciate the glint in their eyes when talking about it. I guess in some ways, I had mistaken this pride for arrogance, but also I have to question if it was a long standing buried jealously of not having competed in it myself. I won’t be joining those who instantly dismiss a graduate CV if FS isn’t present, however there will now have to be clear evidence of something that replicates the engineering and communication skills built from participation in the competition.
Closing thoughts
I came away from the competition having spent more days there than a typical race weekend in professional motorsport, however I certainly wasn’t longing to get away. I did leave however, with an infinitely better understanding of the competition itself, and an admiration of the teams of young engineers and the efforts to get a car there. I am already looking forwards to FSUK 2024, in part to see if the promises of next years plans from a number of teams bears fruit.
I also now understand how Formula Student is celebrating its 25th anniversary in the UK, and the continued growth on a global scale shows no signs of slowing. The number of competitions in different countries continue to grow, and the EV, hybrid and AI cars keeps the competition relevant to the automotive industry. With the launch of Formula Student Africa being announced this year, there is certainly one new FS fan who will be making their way out for the first competition.


